Water Surface Cymatics
Pure tones transform a still water surface into precise geometric mandalas.
What You Learn
In 1831, Michael Faraday noticed something peculiar while studying vibrating surfaces: a layer of water on a vibrating plate didn't simply slosh — it organized itself into regular standing wave patterns. He had discovered what we now call Faraday waves, a form of parametric instability where vertical oscillation of a fluid layer produces horizontal surface patterns at precisely half the driving frequency.
Over a century later, the Swiss physician and natural philosopher Hans Jenny dedicated decades to photographing these patterns, coining the term cymatics (from the Greek kyma, "wave") and publishing his landmark volumes in 1967 and 1972. Jenny saw in these water patterns a visual language connecting physics, biology, and aesthetics — geometry born from vibration.
This experiment teaches you:
- Faraday wave instability: How vertical vibration at frequency f generates surface patterns oscillating at f/2 (subharmonic response)
- Pattern selection: Why specific geometries (stripes, squares, hexagons) emerge depending on frequency, amplitude, and fluid depth
- Standing wave fundamentals: Nodes, antinodes, wavelength, and the dispersion relation for surface gravity-capillary waves
- The role of boundary conditions: How the container's shape constrains which patterns are possible
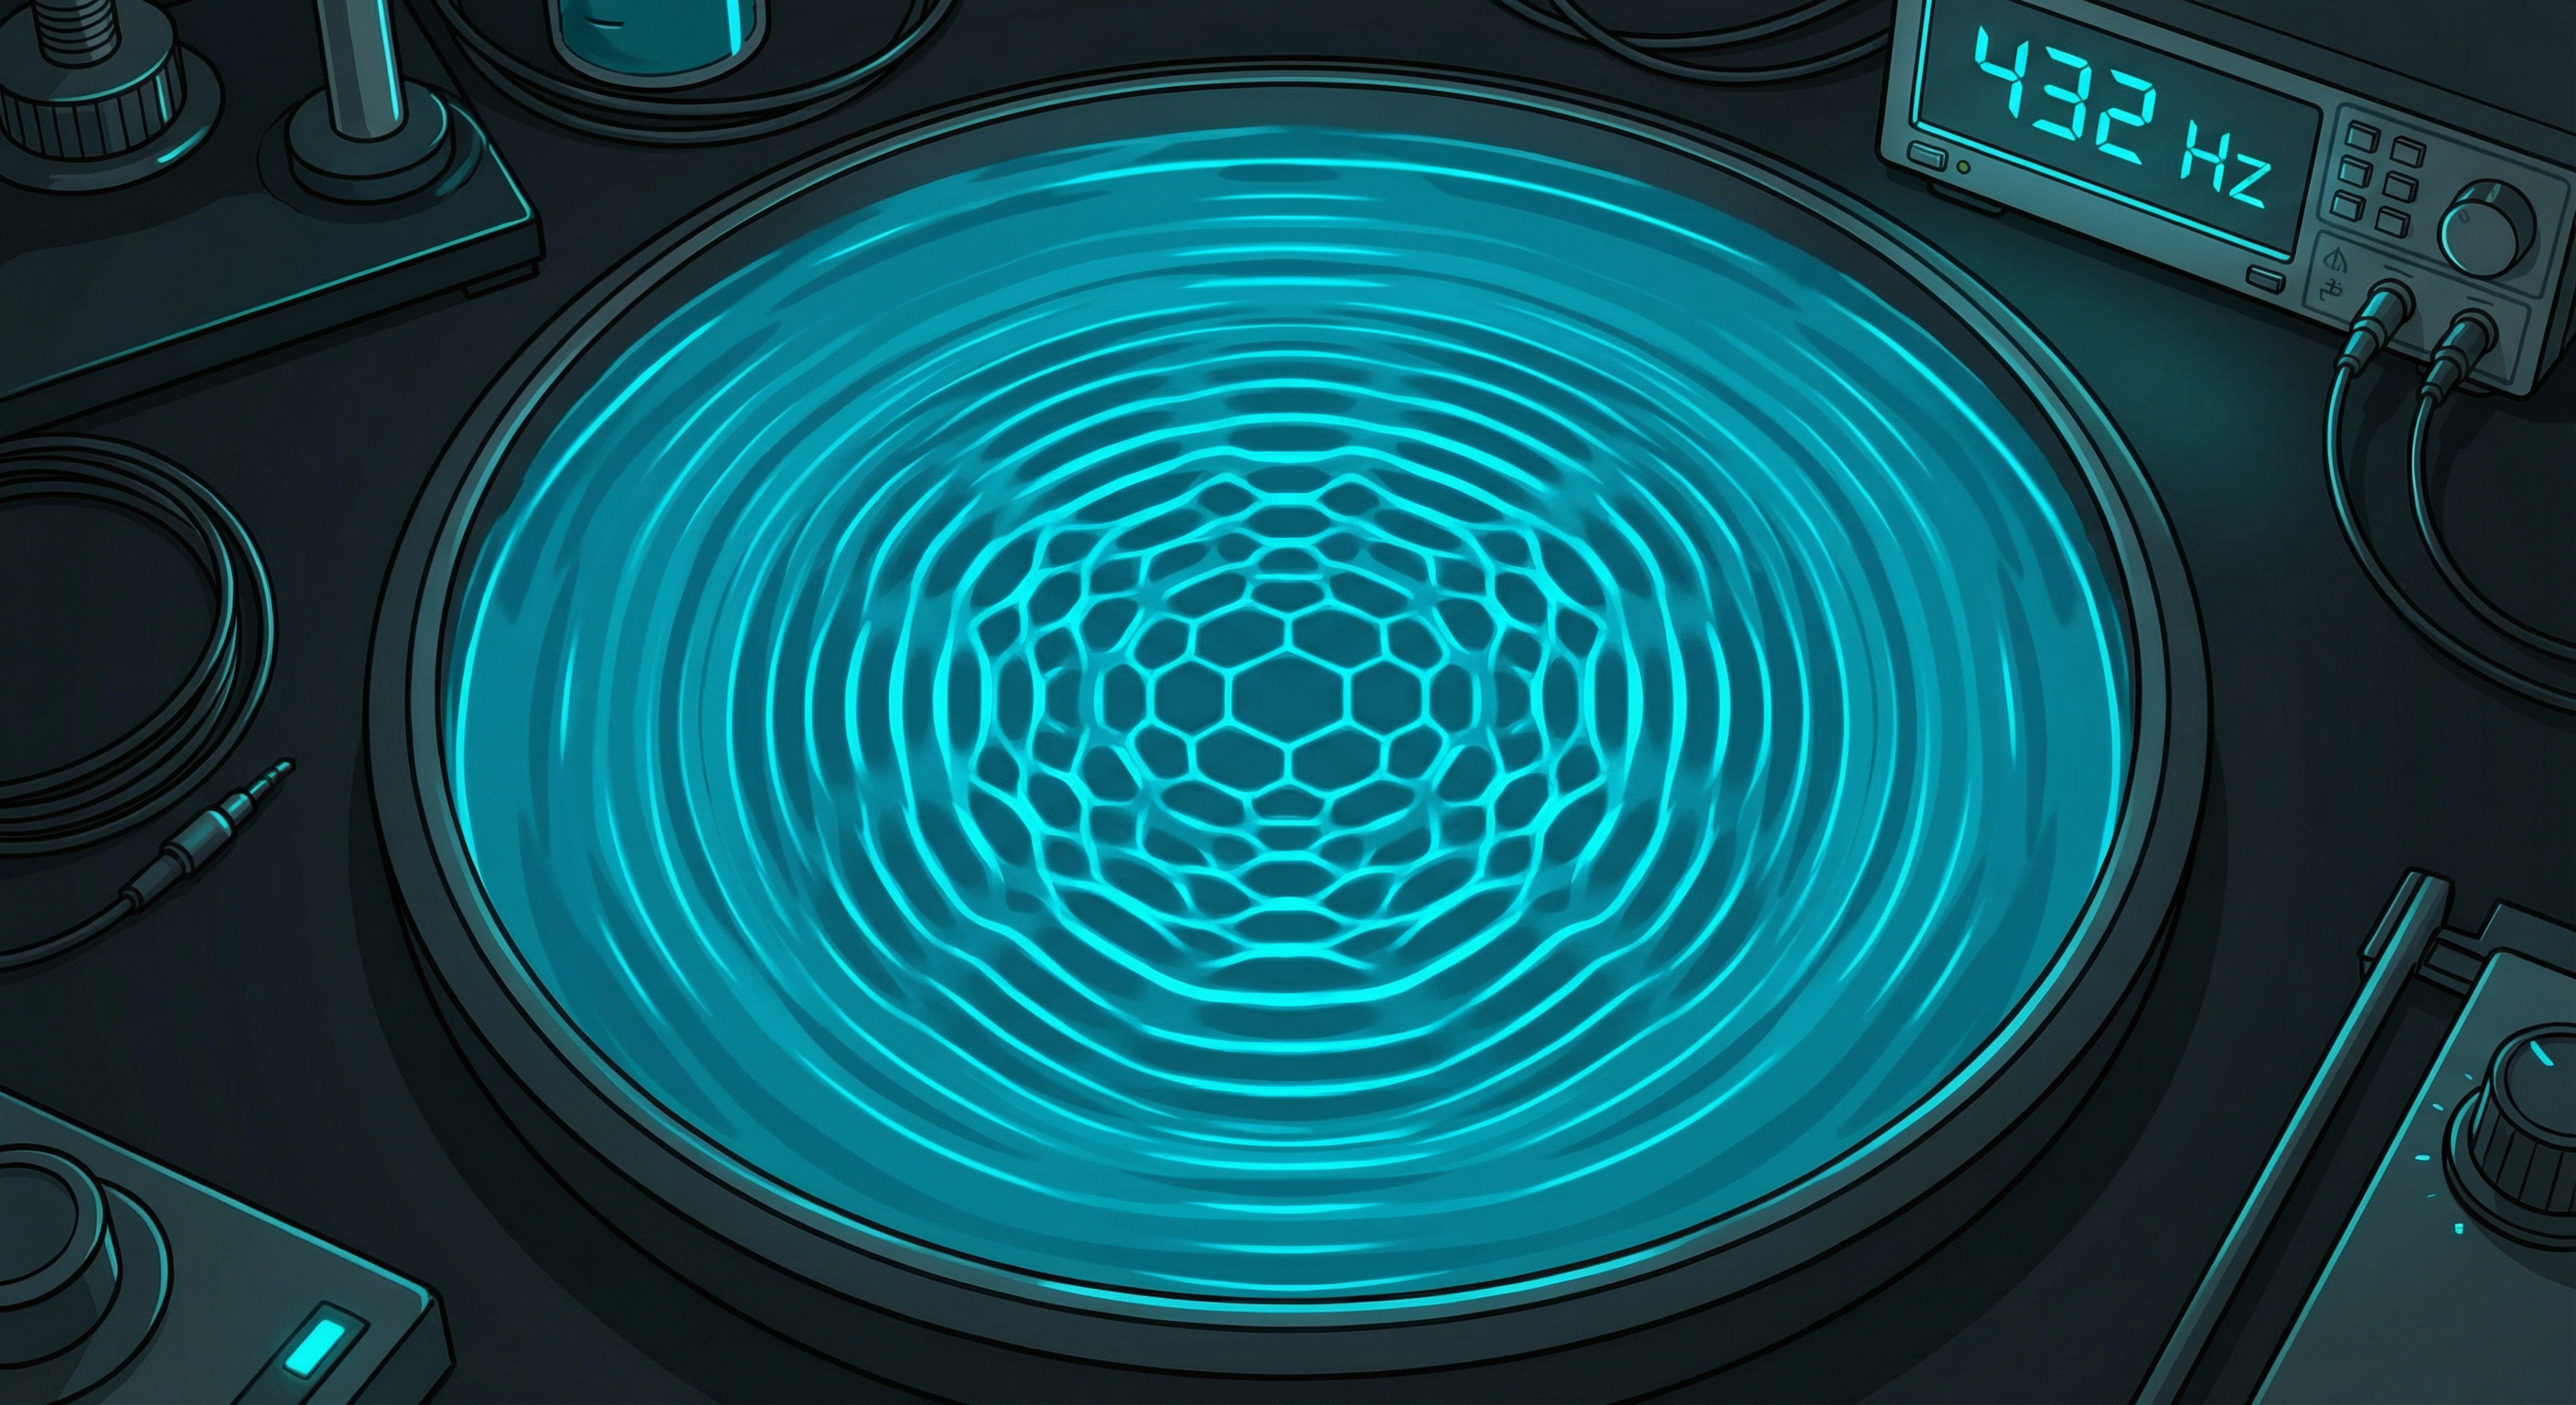 Faraday waves at mid-frequency — the water surface organizes into standing wave geometry.
Safety
- No significant hazards — this experiment uses only water and a speaker
- Protect the speaker cone with plastic wrap to prevent water damage
- Keep electronic equipment (amplifier, phone) away from splashing water
- Clean up spills promptly to avoid slipping or damaging electronics
Safety rating: Green — Suitable for all ages with basic common sense.
Materials
Shallow Dish or Plate
$3–10Circular or square container, 15–25 cm across, with low sides (~2 cm).
Tip: A black-bottomed dish provides the best contrast. Pie tins and petri dishes work well.
Links coming soonSpeaker
$10–25A 5–8 inch driver capable of clean low-frequency output.
Tip: You need a bare driver or face-up subwoofer — Bluetooth speakers are insufficient.
View OptionsAmplifier
$20–70Connected to the speaker; 10–50 W is sufficient.
Tip: Start at zero volume to avoid splashing.
View OptionsTone Generator
FreeApp or software generating precise sine waves from 10–200 Hz.
Tip: 0.1 Hz resolution helps find exact resonant frequencies. tonegenerator.app works in the browser.
Try freeWater
FreeTap water works. Distilled water reduces surface contaminants.
Tip: Start with a shallow depth of 3–5 mm.
Links coming soonFood Coloring or Milk
$2–3Dramatically improves visibility of wave patterns against the dish bottom.
Tip: Milk is particularly effective — it renders the surface opaque for sharp contrast.
Links coming soonPlastic Wrap
$2–3Protects the speaker cone from water damage.
Tip: Secure tightly with a rubber band to prevent sagging.
Links coming soonLED Flashlight or Strobe
$5–15Side-lighting or stroboscopic illumination reveals wave structure beautifully.
Tip: A strobe synced near the driving frequency can freeze the motion.
Links coming soonPaper Towels
$2–3For inevitable spills during the experiment.
Tip: Keep electronics away from the splash zone.
Links coming soonSetup
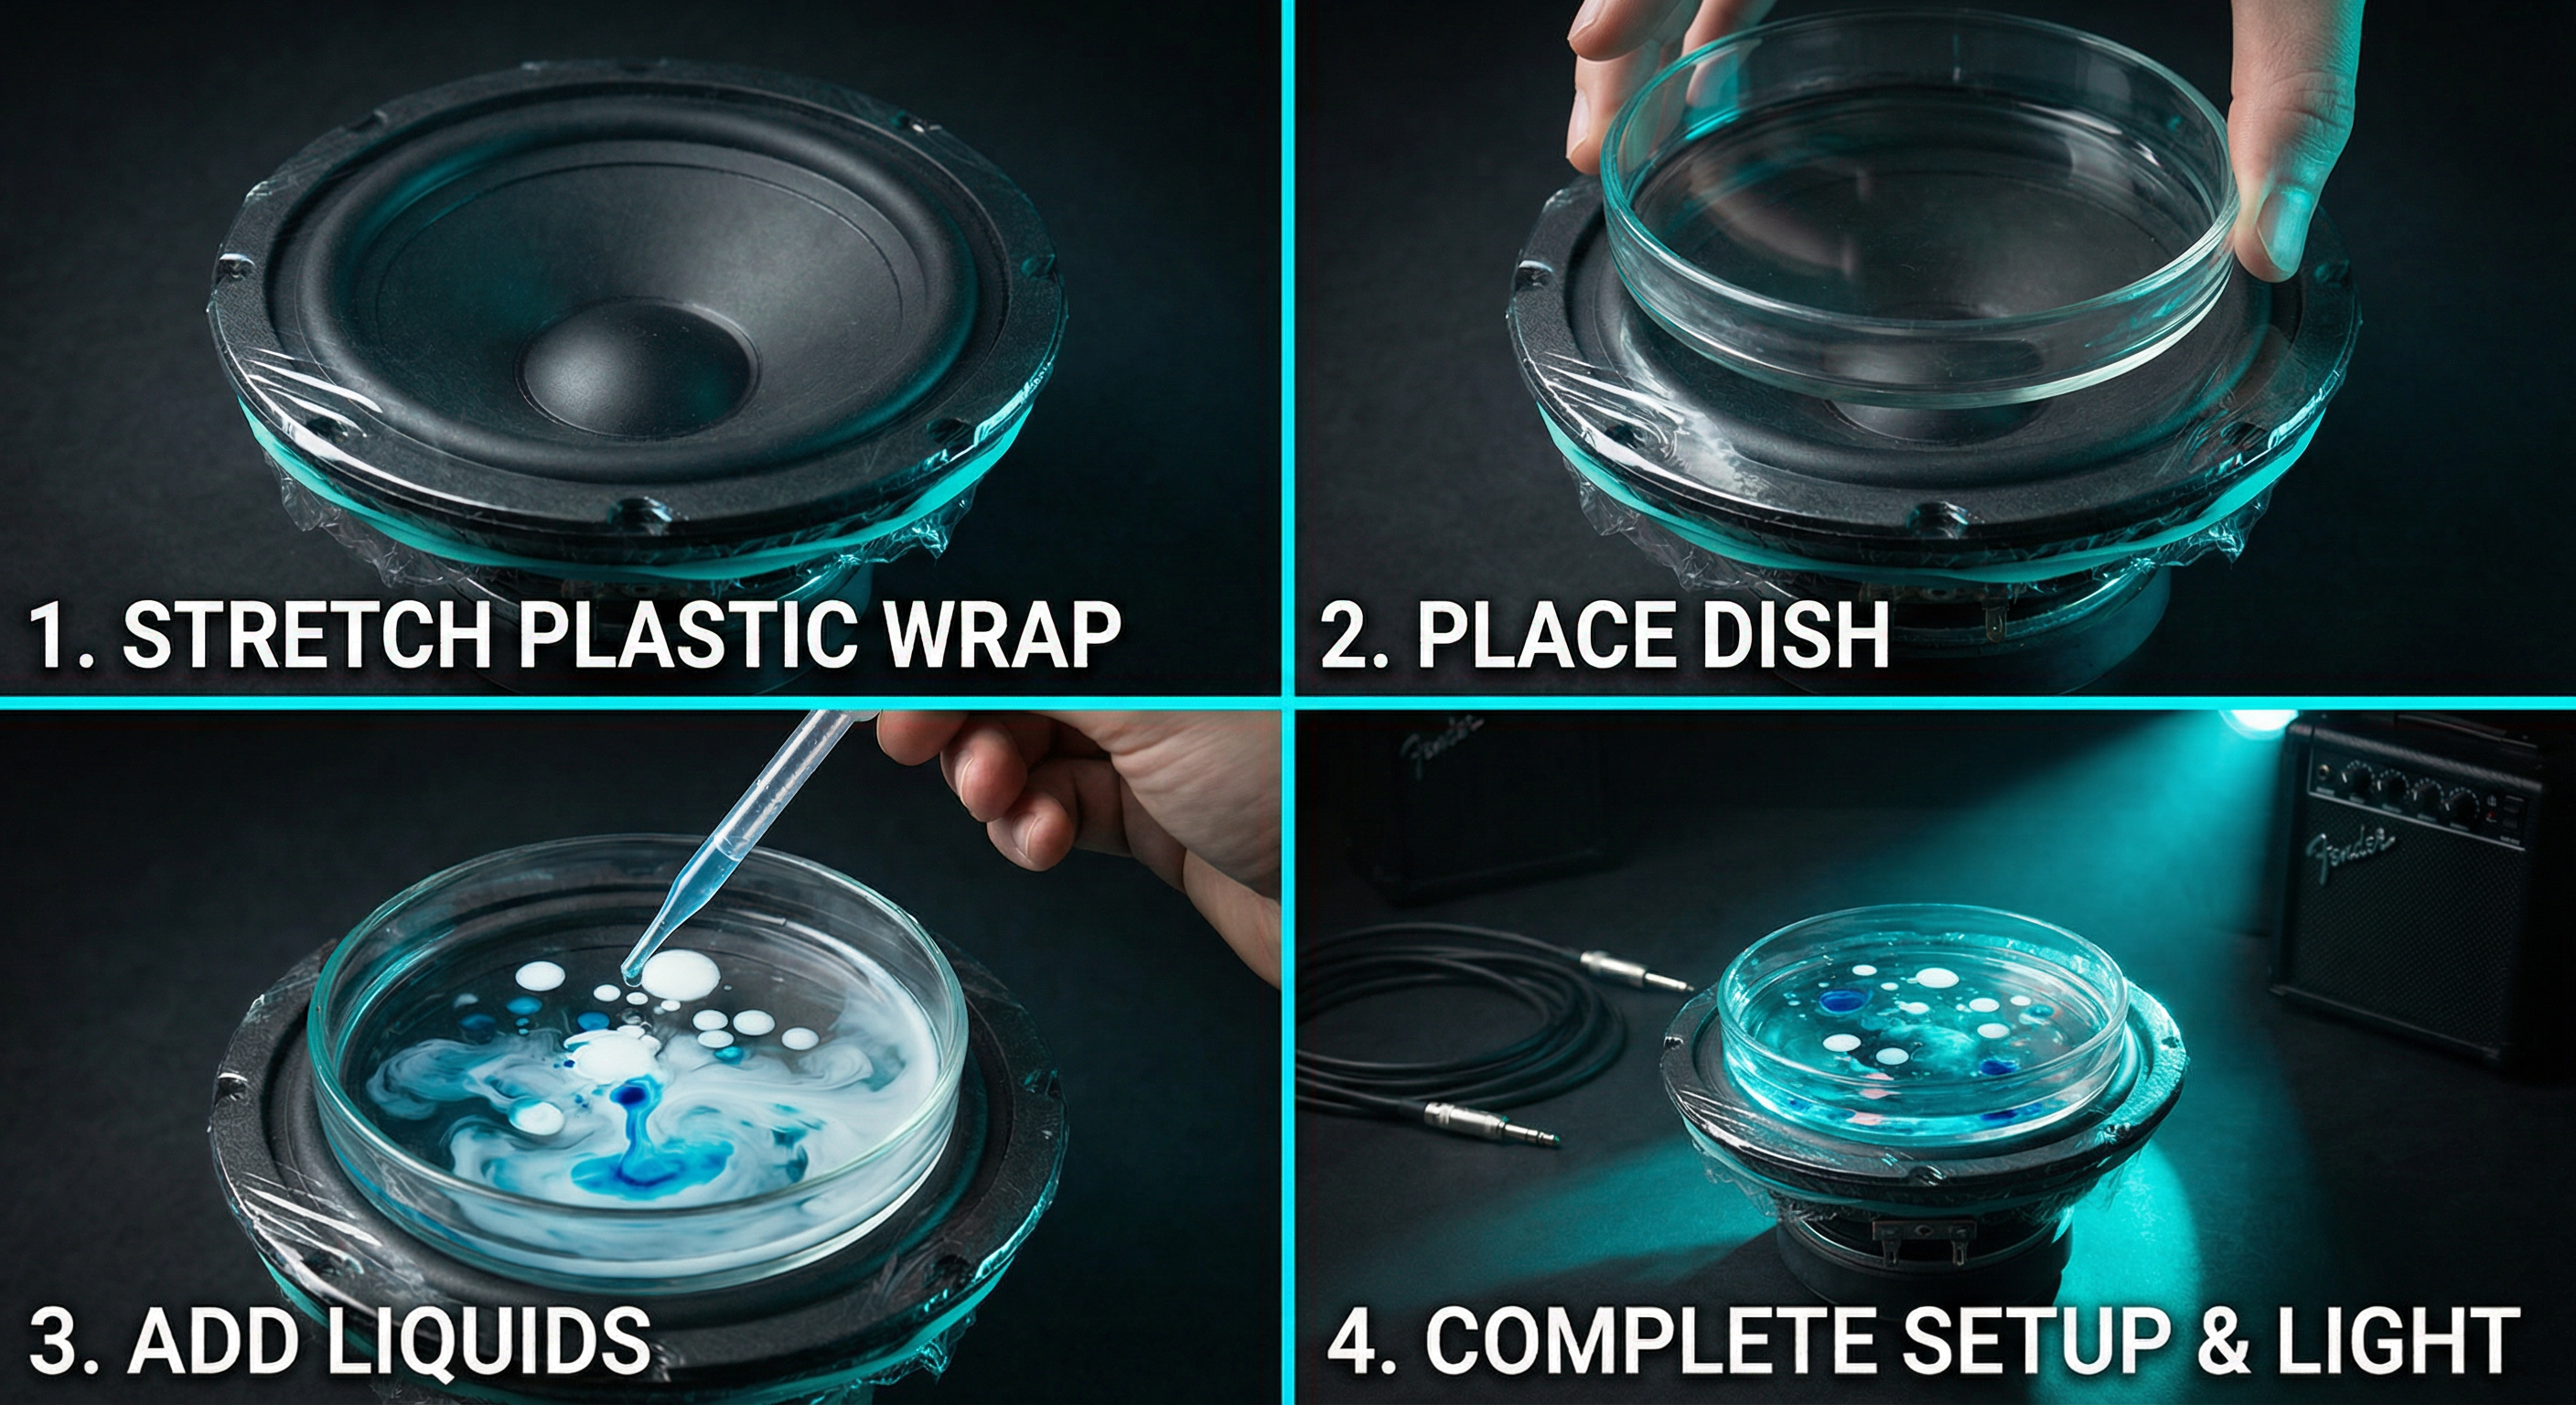 Key assembly steps: plastic wrap → dish on cone → water + milk → lighting.
-
Prepare the speaker. Place it face-up on a stable, level surface. Stretch plastic wrap over the cone tightly — any sagging will dampen the response and allow water ingress. Secure with a rubber band or tape.
-
Place the dish on the center of the speaker cone. For best coupling, the dish should rest directly on the wrapped cone. If it slides, a small ring of mounting putty helps.
-
Add water to a depth of approximately 3–5 mm. Depth matters: shallow water favors capillary waves (surface tension dominated), while deeper water brings gravity waves into play. Start shallow.
-
Add a few drops of milk or food coloring. Milk is particularly effective — it renders the water surface opaque, so the wave crests and troughs create sharp light-and-shadow contrast.
-
Connect the signal chain: Tone generator → Amplifier → Speaker. Set volume to zero.
-
Arrange lighting. A single LED flashlight at a low angle across the water surface reveals the wave pattern topography through shadow. Overhead lighting tends to wash out the detail.
Procedure
Phase 1 — The Onset of Pattern
Set your tone generator to 80 Hz and very slowly increase the amplitude. At first, nothing visible happens — the water surface trembles microscopically. Then, at a critical amplitude (the Faraday threshold), the surface suddenly and dramatically organizes into a pattern of standing waves.
One moment, stillness. The next, geometry — as if the water remembered a shape it had been waiting to become.
This threshold transition is subcritical — it snaps into existence rather than growing gradually. Note the exact amplitude at which the pattern appears and disappears (hysteresis: the pattern may persist at amplitudes below the onset threshold).
Phase 2 — Frequency and Geometry
Sweep the frequency slowly from 10 Hz to 200 Hz, pausing at each point where a clear pattern forms:
- 10–30 Hz: Large-scale, slow-moving concentric rings or radial patterns. The wavelength is long relative to the dish.
- 30–80 Hz: Mid-scale grids, squares, and hexagonal lattices emerge. These are the classic cymatic mandalas.
- 80–150 Hz: Finer patterns with shorter wavelength. Star shapes and complex tessellations appear.
- 150–200 Hz: Very fine ripple patterns, often concentric. Surface tension dominates at these short wavelengths.
At each resonant frequency, the pattern wavelength λ follows the dispersion relation for gravity-capillary waves:
ω² = gk + (σ/ρ)k³
where ω is the angular frequency, g is gravity, k = 2π/λ is the wavenumber, σ is surface tension, and ρ is the fluid density.
Phase 3 — Depth Dependence
Repeat the experiment at different water depths: 2 mm, 5 mm, 10 mm. You will find that:
- The Faraday threshold amplitude changes with depth
- The pattern wavelength may shift at the same frequency
- Deeper water permits longer-wavelength gravity-wave modes
This demonstrates the role of the hyperbolic tangent factor in the full dispersion relation for finite-depth fluids.
Phase 4 — Container Geometry
Try different dish shapes — circular, square, rectangular. The boundary conditions imposed by the container walls select which standing wave patterns can fit inside:
- Circular dish: Concentric rings and radial star patterns (Bessel function modes)
- Square dish: Grid-like patterns aligned with the walls
- Rectangular dish: Patterns with different wavelengths along each axis
Photograph each pattern from directly above for your records. These are eigenmodes of the container-fluid system.
Sources
- Jenny, Hans. Cymatics: A Study of Wave Phenomena and Vibration. Basel: Basilius Presse, 1967. Reprinted by MACROmedia, 2001.
- Faraday, Michael. "On a Peculiar Class of Acoustical Figures; and on Certain Forms Assumed by Groups of Particles upon Vibrating Elastic Surfaces." Philosophical Transactions of the Royal Society of London 121 (1831): 299–340.
- Benjamin, T. Brooke, and Ursell, Fritz. "The Stability of the Plane Free Surface of a Liquid in Vertical Periodic Motion." Proceedings of the Royal Society A 225, no. 1163 (1954): 505–515.
- Kudrolli, Arshad, and Gollub, Jerry P. "Patterns and Spatiotemporal Chaos in Parametrically Forced Surface Waves." Physica D 97, no. 1–3 (1997): 133–154.