Rubens' Tube
A row of flames dances to reveal the pressure anatomy of sound waves.
What You Learn
In 1905, the German physicist Heinrich Rubens and his colleague Otto Krigar-Menzel constructed a deceptively simple apparatus: a metal tube perforated with a row of small holes, sealed at one end and fitted with a loudspeaker at the other, then filled with flammable gas. When ignited, a line of small flames rose from the holes. When sound entered the tube, the flames changed height — tall where gas pressure was high, short where it was low — tracing the invisible pressure landscape of a standing wave in fire.
The Rubens' tube remains one of the most viscerally compelling demonstrations in acoustics. It renders sound thermally visible, converting the abstract mathematics of longitudinal pressure waves into a phenomenon you can see and feel across the room.
This experiment teaches you:
- Standing waves in a closed tube: How incident and reflected sound waves superimpose to create stationary patterns of pressure nodes and antinodes
- The relationship between pressure and displacement in a longitudinal wave — pressure antinodes occur at displacement nodes, and vice versa
- Resonant frequencies of a pipe: Only frequencies whose half-wavelengths fit integer multiples into the tube length will produce clean standing wave patterns (f_n = nv / 2L)
- Gas dynamics: How local pressure variations in the tube translate to differential gas flow rates through the perforations, modulating flame height
- The speed of sound in gas: By measuring the wavelength (distance between flame-height maxima) and knowing the frequency, you can calculate v = fλ for propane
Rubens' original paper described the tube as a way to make "acoustic observations visible" — Flammenröhre für akustische Beobachtungen. More than a century later, it still does this better than almost any other demonstration.
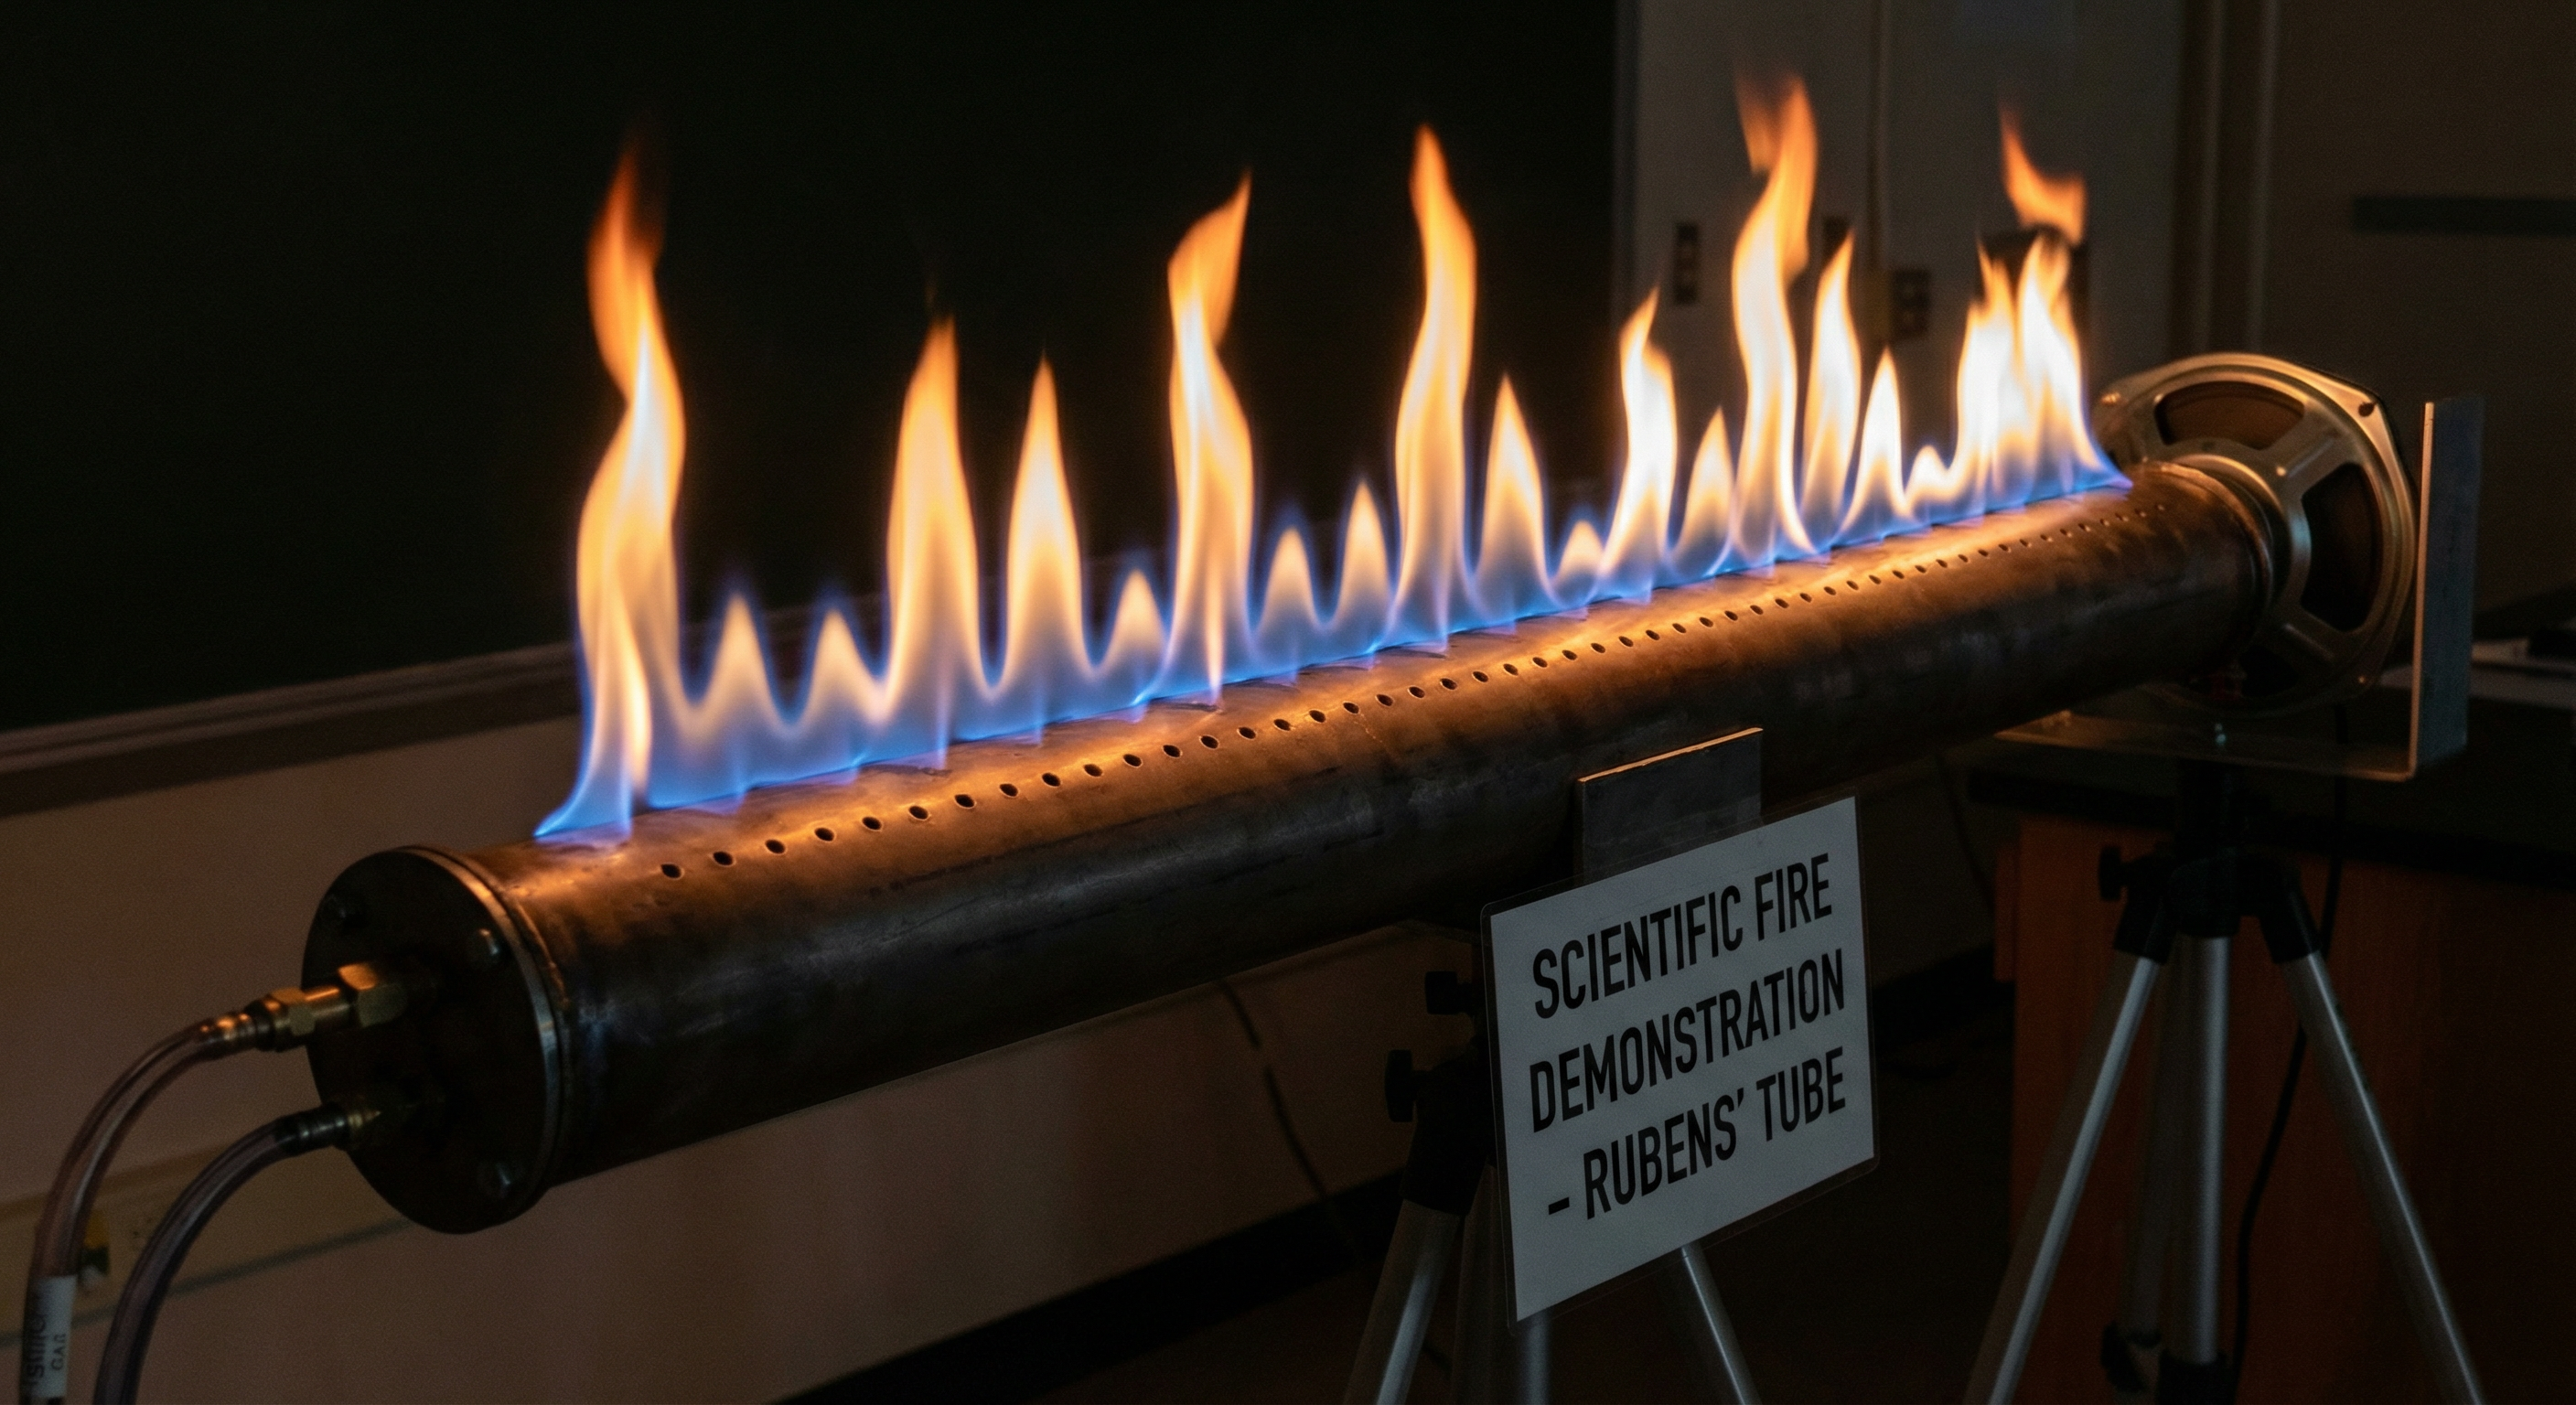 Tall flames = pressure antinodes; short flames = nodes. Sound made thermally visible.
Safety
Safety rating: Red — This experiment involves open flame and pressurized flammable gas. Strict protocols are mandatory.
- Fire extinguisher (Class B, rated for flammable gas) must be within arm's reach and inspected before beginning
- Work in a well-ventilated space — propane is heavier than air and will pool at ground level if leaked. Never perform this in a closed room without forced ventilation
- No loose clothing, long hair, or dangling accessories near the apparatus. Tie back hair; roll up sleeves
- Adult supervision mandatory — this experiment is not suitable for unsupervised students of any age
- Leak-test all gas connections with soapy water before igniting. Bubbles indicate leaks. Fix every leak before proceeding
- Never leave the apparatus unattended while gas is flowing
- Shut off gas at the source (tank valve, not just the regulator) when finished or if anything unexpected occurs
- Propane exposure: Propane is an asphyxiant in high concentrations. If you smell gas strongly (the odorant mercaptan), shut off the supply immediately and ventilate the area
- Burns: The tube and surrounding metal become hot during operation. Allow cooling time before handling
- Keep a clear perimeter — no combustible materials within 1 meter of the tube
Materials
Metal Tube
$20–40Steel or aluminum, 1–2 meters long, 5–10 cm diameter. Thicker walls are more durable.
Tip: Stainless steel resists heat corrosion best.
Links coming soonSmall Holes Drilled Along Top
N/A (DIY)Evenly spaced, 1–2 mm diameter, 1–2 cm apart, in a straight line along the top.
Tip: Precision matters — uneven spacing creates artifacts.
Links coming soonEnd Caps
$5–10One sealed (welded or bolted), one fitted with a speaker mount. Both must be gas-tight.
Tip: Use a flexible rubber gasket or silicone sealant around the speaker frame.
Links coming soonSpeaker
$10–25A 4–6 inch driver mounted in or against the open end cap.
Tip: Does not need to be high-fidelity — a clean sine wave at moderate volume is sufficient.
View OptionsAmplifier
$20–4010–50 W, connected to the speaker.
Tip: Keep volume at zero until flames are established.
View OptionsTone Generator
FreeApp or software producing sine waves from 100–600 Hz.
Tip: Sweep slowly to find resonant frequencies of your tube. tonegenerator.app works in the browser.
Try freePropane Supply
$10–20A small propane tank (camping-style) with a regulator and flexible hose.
Tip: Natural gas from a lab bench tap also works.
Links coming soonGas-tight Fittings
$5–10Barbed hose connectors, hose clamps, and PTFE tape for all threaded joints.
Tip: Leak-test every joint with soapy water before ignition.
Links coming soonSoapy Water and Brush
$2–3For leak testing every joint before ignition.
Tip: Bubbles indicate leaks — fix every one before proceeding.
Links coming soonLong-reach Lighter
$3–5To ignite the flames from a safe distance.
Tip: Fireplace matches also work well.
Links coming soonFire Extinguisher (Class B)
$15–30Non-negotiable. Must be within arm's reach during operation.
Tip: Inspect before beginning and ensure it is rated for flammable gas.
Links coming soonHeat-resistant Surface
$5–15Metal table or fire bricks beneath the tube.
Tip: The tube and surrounding metal become hot — allow cooling time before handling.
Links coming soonSetup
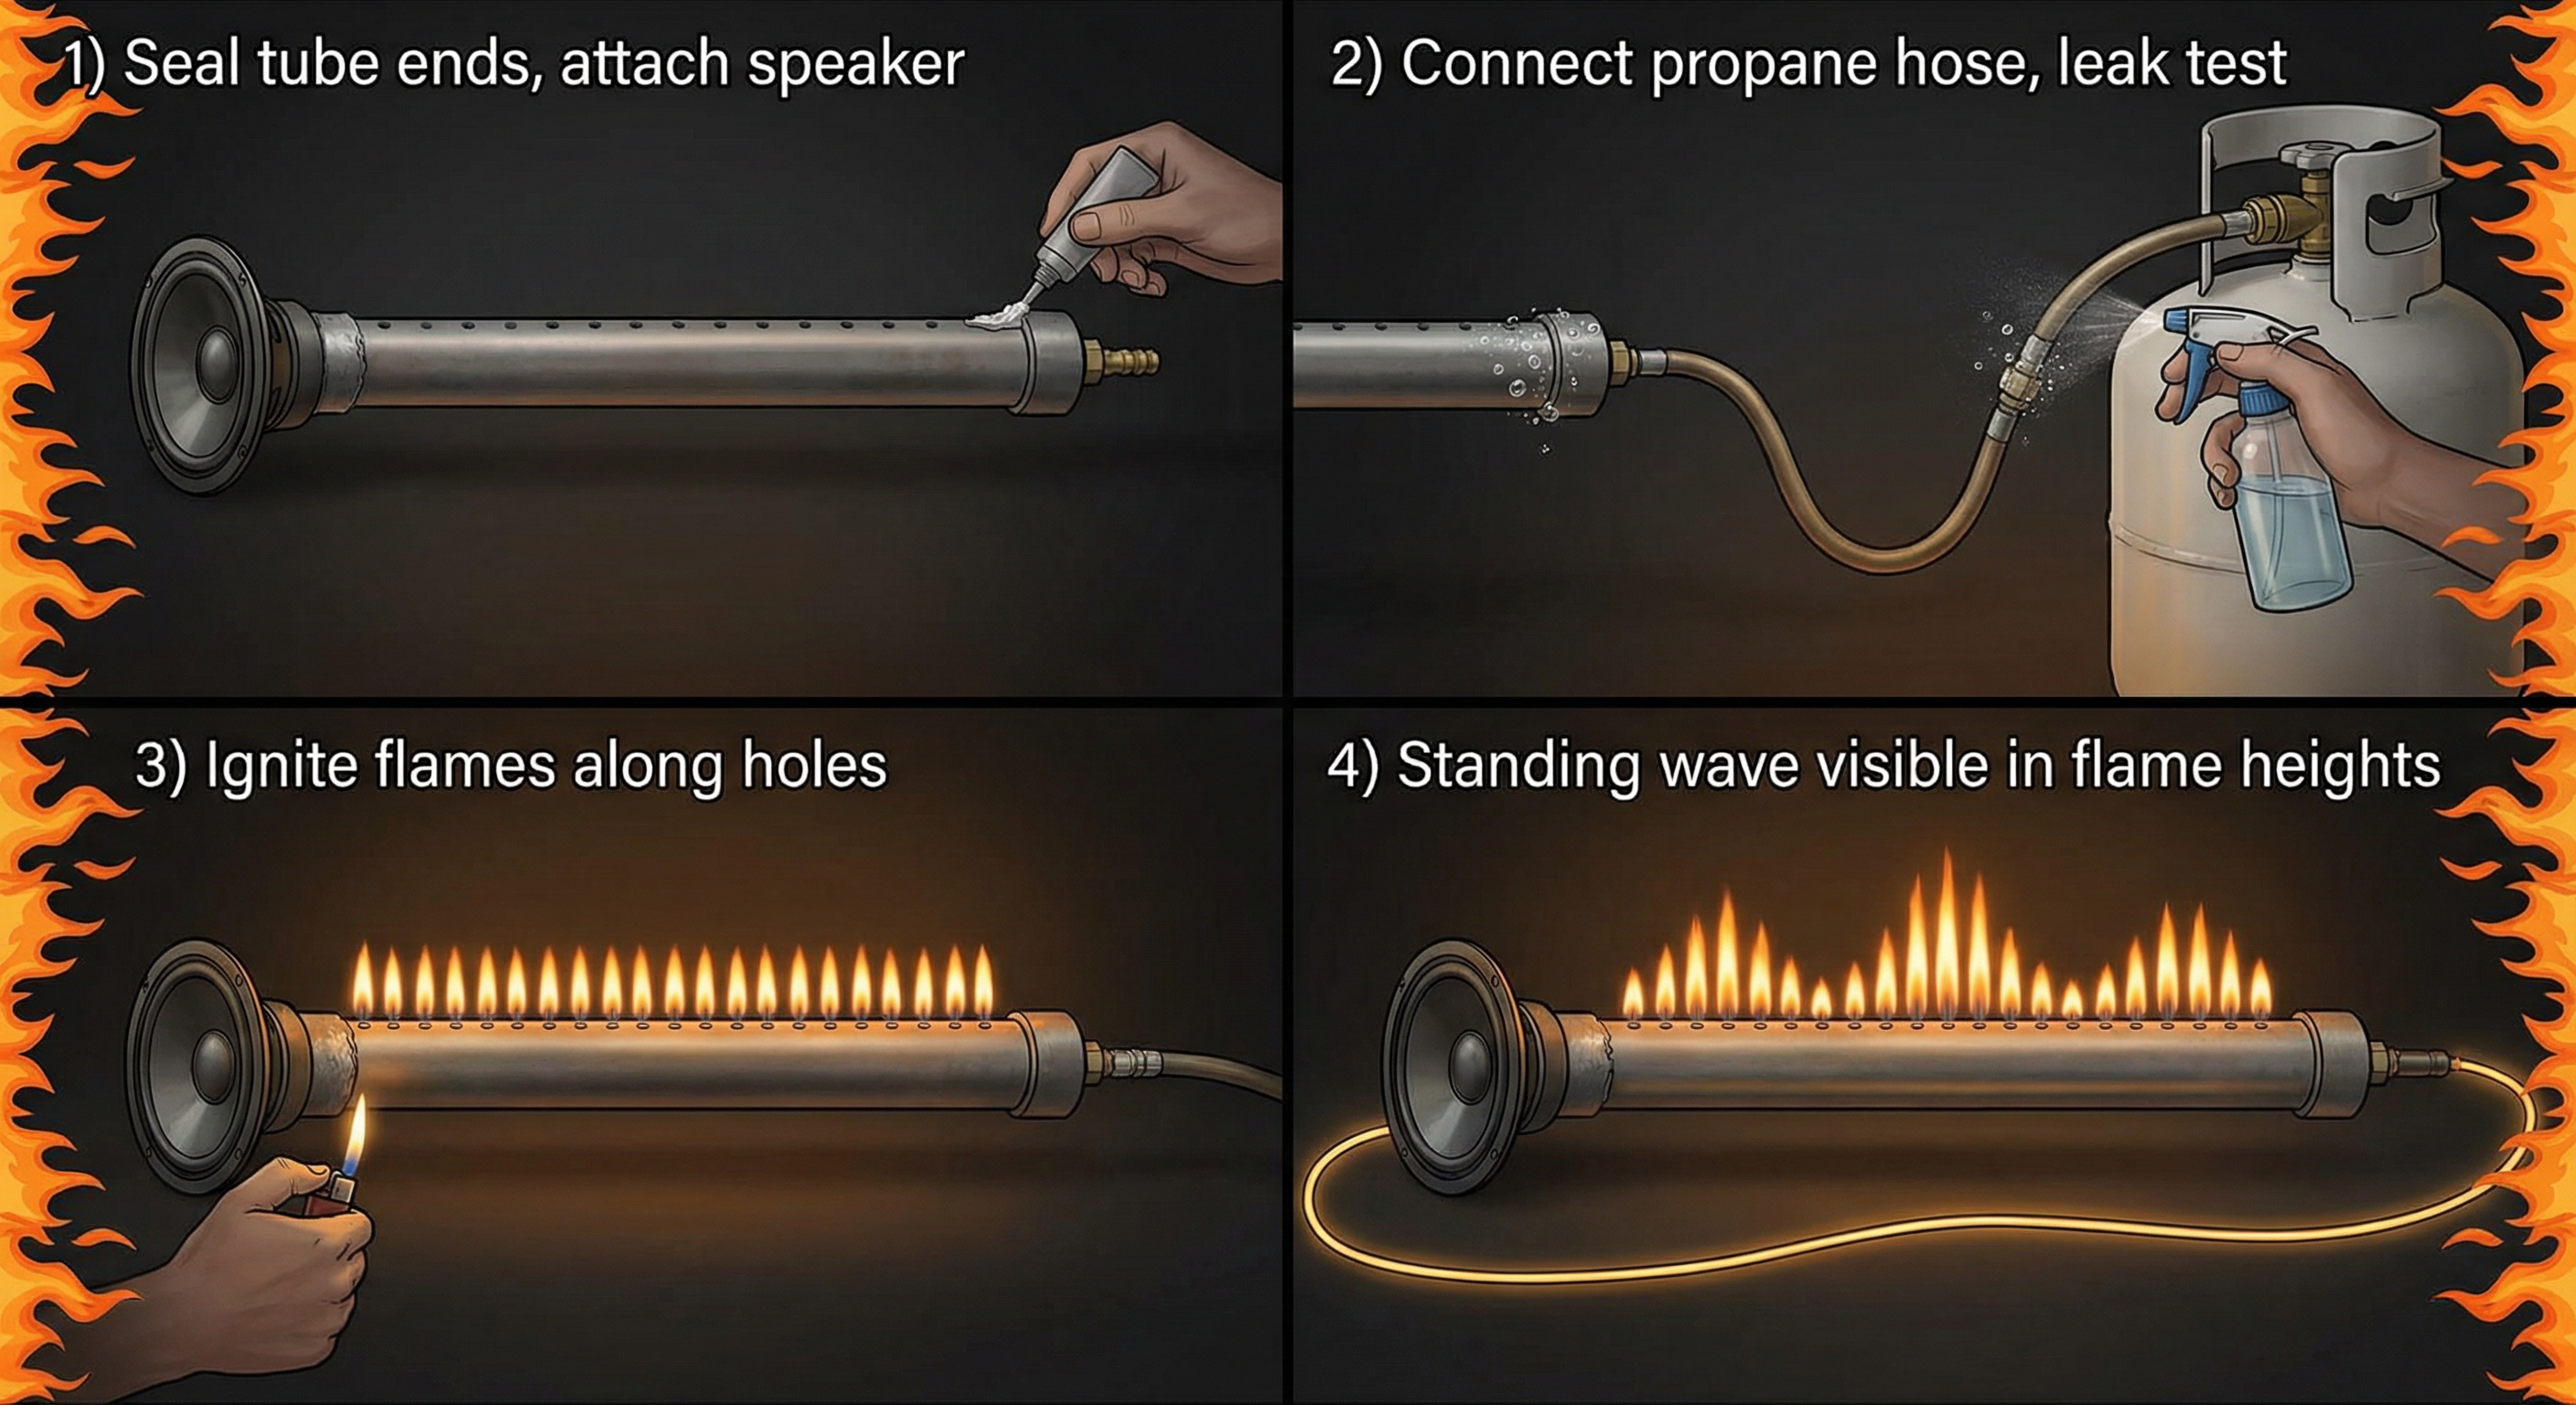 Key assembly steps: airtight tube + speaker → propane connection → leak test → ignite. Fire extinguisher required.
-
Assemble the tube. Seal one end completely. Attach the speaker housing to the other end, ensuring an airtight seal around the speaker cone. The speaker diaphragm must be able to move freely while maintaining a gas-tight boundary — a flexible rubber gasket or silicone sealant around the speaker frame works well.
-
Connect the gas supply. Attach the propane hose to a fitting on the sealed end (or bottom) of the tube. The gas inlet should be positioned so propane fills the tube evenly. Use PTFE tape on all threaded connections. Tighten hose clamps securely.
-
Leak test. With the speaker end sealed and gas flowing gently, brush soapy water over every joint, seam, and the speaker gasket. Watch for bubbles. Fix every leak. This step is not optional.
-
Position the tube horizontally on a heat-resistant surface, holes facing straight up. Ensure the tube is level — gravity will cause propane to pool at the low end if tilted, creating uneven flame heights.
-
Connect the signal chain: Tone generator → Amplifier → Speaker. Volume at zero.
-
Clear the area. Remove all combustible materials. Establish a one-meter perimeter. Ensure your fire extinguisher is accessible and the room is ventilated.
Procedure
Phase 1 — Establishing the Flame Row
Turn on the gas supply and wait 30–60 seconds for propane to fill the tube and displace the air. You may hear a faint hiss from the holes. Using a long-reach lighter, ignite the flames starting from one end. A row of small, even, blue-yellow flames should appear along the top of the tube.
Allow the flames to stabilize for one to two minutes. Adjust the gas flow rate until the flames are roughly uniform in height — approximately 3–5 cm. Flames that are too tall are wasteful and hazardous; flames that are too short may extinguish when sound is applied.
A quiet line of fire, each flame identical, each one waiting to tell a different part of the same story.
Phase 2 — Finding Resonance
Set your tone generator to 200 Hz and slowly increase the amplifier volume. At first, the flames may flicker uniformly. As you approach a resonant frequency of the tube, you will suddenly see a dramatic differentiation: some flames grow tall while their neighbors shrink low. The pattern of tall and short flames directly maps the pressure distribution of the standing wave inside the tube.
- Tall flames = pressure antinodes (high oscillating pressure pushes more gas through the hole)
- Short flames = pressure nodes (minimal pressure variation, less gas flow)
Count the number of tall-flame peaks. Each pair of adjacent peaks is separated by one half-wavelength: λ/2 = L/n where L is the tube length and n is the mode number.
Phase 3 — Walking the Harmonics
Sweep the frequency slowly from 100 Hz to 600 Hz. At each resonant frequency, a new standing wave pattern will emerge with a different number of nodes:
- Fundamental mode: One half-wavelength fits in the tube — one tall region in the center, short flames at the ends
- Second harmonic: Two half-wavelengths — two tall regions with a node between them
- Higher harmonics: Increasingly many alternating tall and short regions
Record the resonant frequencies f_1, f_2, f_3, ... They should form a roughly harmonic series: f_n ≈ n × f_1. Any deviation reveals information about the end corrections and temperature gradients inside the tube.
Phase 4 — Measuring the Speed of Sound
For any clearly resolved mode, measure the distance between adjacent flame-height maxima. This distance is one half-wavelength (λ/2). Calculate:
v = f × λ
The speed of sound in propane at room temperature is approximately 250 m/s (compared to ~343 m/s in air), because propane's higher molecular mass reduces the wave speed. Your measured value should be in this range — a beautiful confirmation that your row of flames has quantitatively captured the physics of wave propagation.
Phase 5 — Shutdown
- Turn the amplifier volume to zero
- Turn off the tone generator
- Shut off the gas at the tank valve — not just the regulator
- Allow the remaining gas in the tube to burn off (flames will shrink and extinguish on their own)
- Do not touch the tube until it has cooled — metal retains heat for several minutes
- Verify the gas valve is fully closed
Sources
- Rubens, Heinrich, and Krigar-Menzel, Otto. "Flammenröhre für akustische Beobachtungen." Annalen der Physik 322, no. 6 (1905): 149–164.
- Ficken, Gerald W., and Stephenson, Frank C. "Rubens Flame-Tube Demonstration." The Physics Teacher 17, no. 5 (1979): 306–310.
- Spagna, George. "Quantitative Experiments Using Rubens' Flame Tube." American Journal of Physics 51, no. 9 (1983): 848–850.
- Halliday, David, Resnick, Robert, and Walker, Jearl. Fundamentals of Physics. 12th ed. Hoboken: Wiley, 2021. Chapter 17: Waves — II (Sound Waves).