Chladni Plate Resonance
Watch sand trace the invisible architecture of standing waves on a vibrating metal plate.
What You Learn
In 1787, the German physicist Ernst Florens Friedrich Chladni drew a violin bow across the edge of a metal plate dusted with fine sand — and the sand moved. Not randomly, but with purpose, streaming away from the vibrating regions and settling into precise geometric lines. These nodal lines are the silent architecture of sound: the places where the plate stands perfectly still even as the rest of it rings.
This experiment teaches you:
- How standing waves form on two-dimensional surfaces
- The relationship between frequency and geometric complexity — higher pitches yield more intricate patterns
- The concept of eigenfrequencies (natural resonant frequencies unique to a plate's material, shape, and boundary conditions)
- Why nodal lines represent points of zero displacement in a vibrating system
Chladni's patterns are not merely decorative. They are solutions to the biharmonic equation governing plate vibration, and they gave 19th-century physicists their first visual map of two-dimensional wave behavior. Napoleon was so impressed by a demonstration that he funded a prize through the French Academy of Sciences, famously won by Sophie Germain in 1816 for her mathematical theory of elastic surfaces.
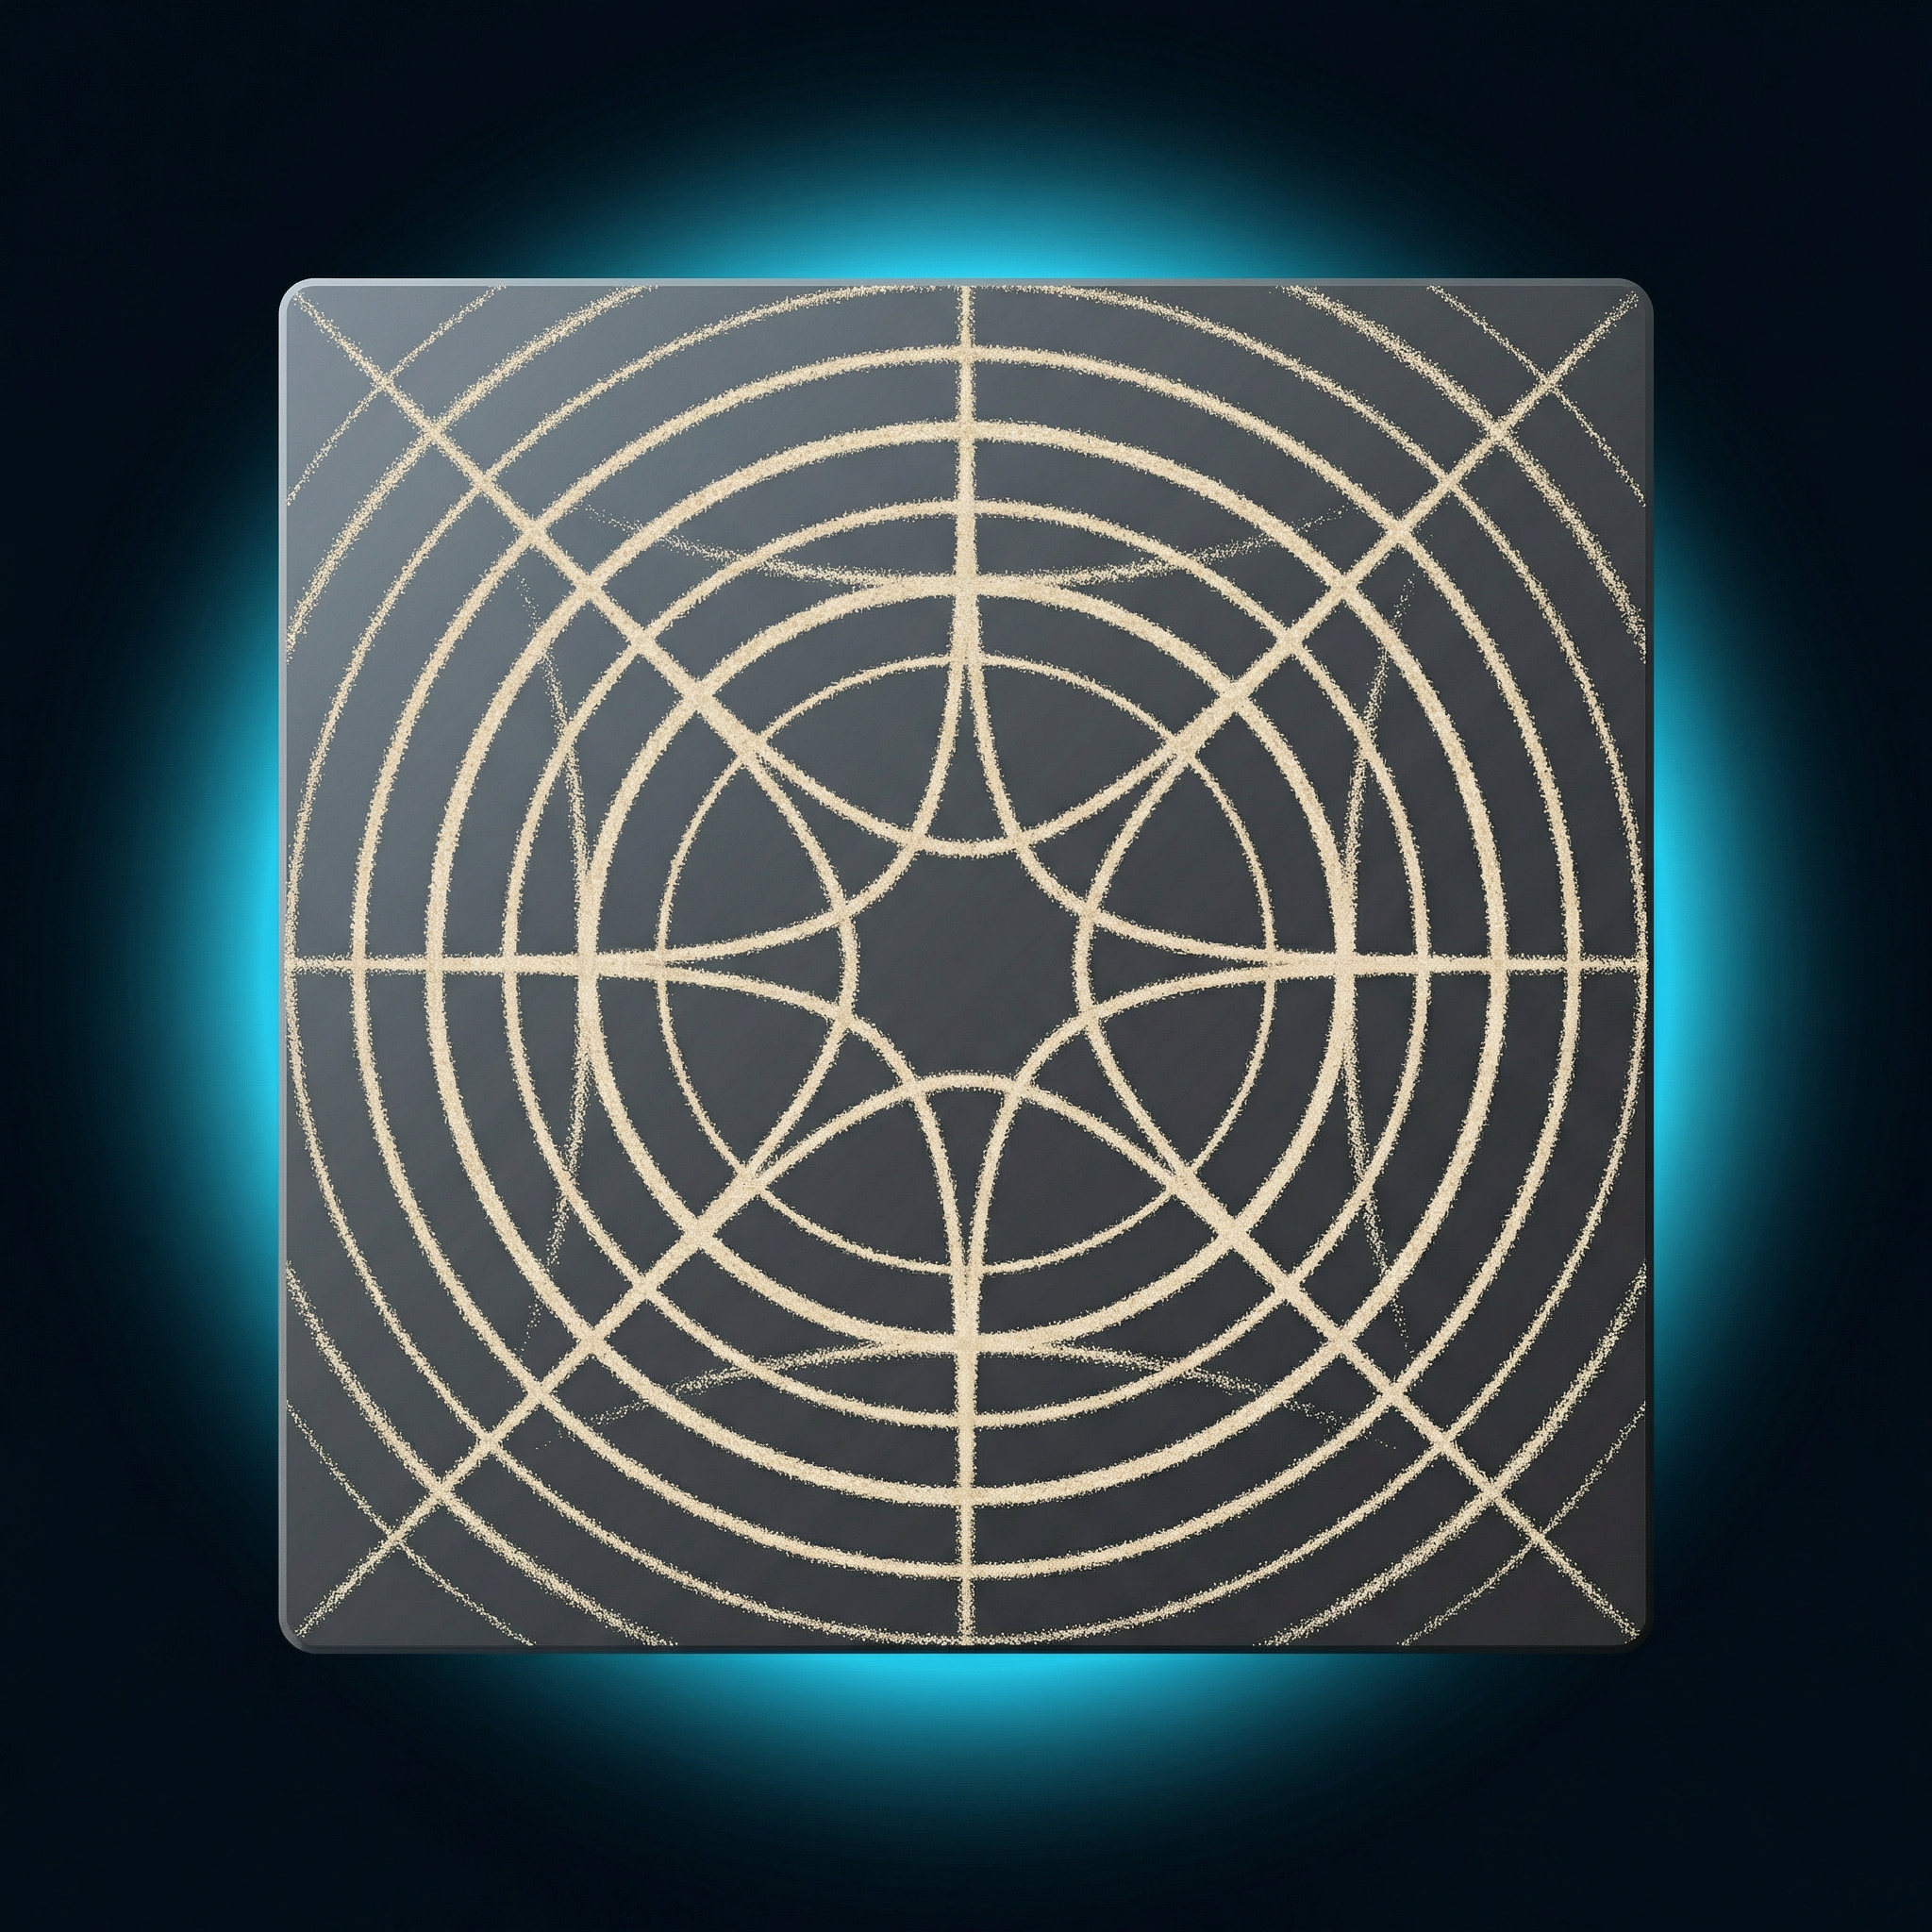 Typical Chladni pattern at mid-frequency — sand migrates to nodal lines where the plate stands still.
Safety
- Ear protection recommended at high amplitudes — prolonged exposure to driven tones above 85 dB can damage hearing
- Fine sand can irritate eyes; avoid blowing on the plate while sand is in motion
- If using a violin bow, rosin dust is mildly irritating to airways — work in a ventilated space
- Speaker-driven setups at high power can be loud; start at low volume and increase gradually
Safety rating: Green — No significant hazards with normal precautions.
Materials
Thin Metal Plate
$10–30Square or circular, 20–30 cm. Brass or aluminum ~0.5–1 mm thick works well.
Tip: Pre-made Chladni plates are available from science suppliers.
View OptionsSpeaker Driver
$10–25Mechanical oscillator for repeatable frequencies. Epoxy a threaded post to the cone center for plate coupling.
Tip: A small full-range driver works well across the Chladni frequency range.
View OptionsViolin Bow (optional)
$15–30Alternative to the speaker: tactile control for exploring modes by drawing along the plate edge.
Tip: A student bow is sufficient. Used with rosin for grip on the plate.
View OptionsRosin (optional)
$5–15Applied to bow hair for friction when using a violin bow instead of a speaker.
Tip: Apply liberally to the bow. Required when using the bow method.
View OptionsFine Sand
$3–5Play sand, salt, or lycopodium powder for revealing nodal patterns.
Tip: Finer grains resolve detail better.
View OptionsFrequency Generator
FreeA tone generator app (mobile or desktop) for driving the speaker.
Tip: Use an app with fine resolution for precise frequency tuning. tonegenerator.app works in the browser.
Try freeAmplifier
$20–70Enough to vibrate the plate visibly, around 5–20 W.
Tip: Start at low volume and increase gradually. Shared across multiple experiments.
View OptionsClamp or Central Mount
$5–15Supports the plate at a single central point for free edge vibration.
Tip: Any additional contact will dampen modes and distort patterns.
View OptionsSetup
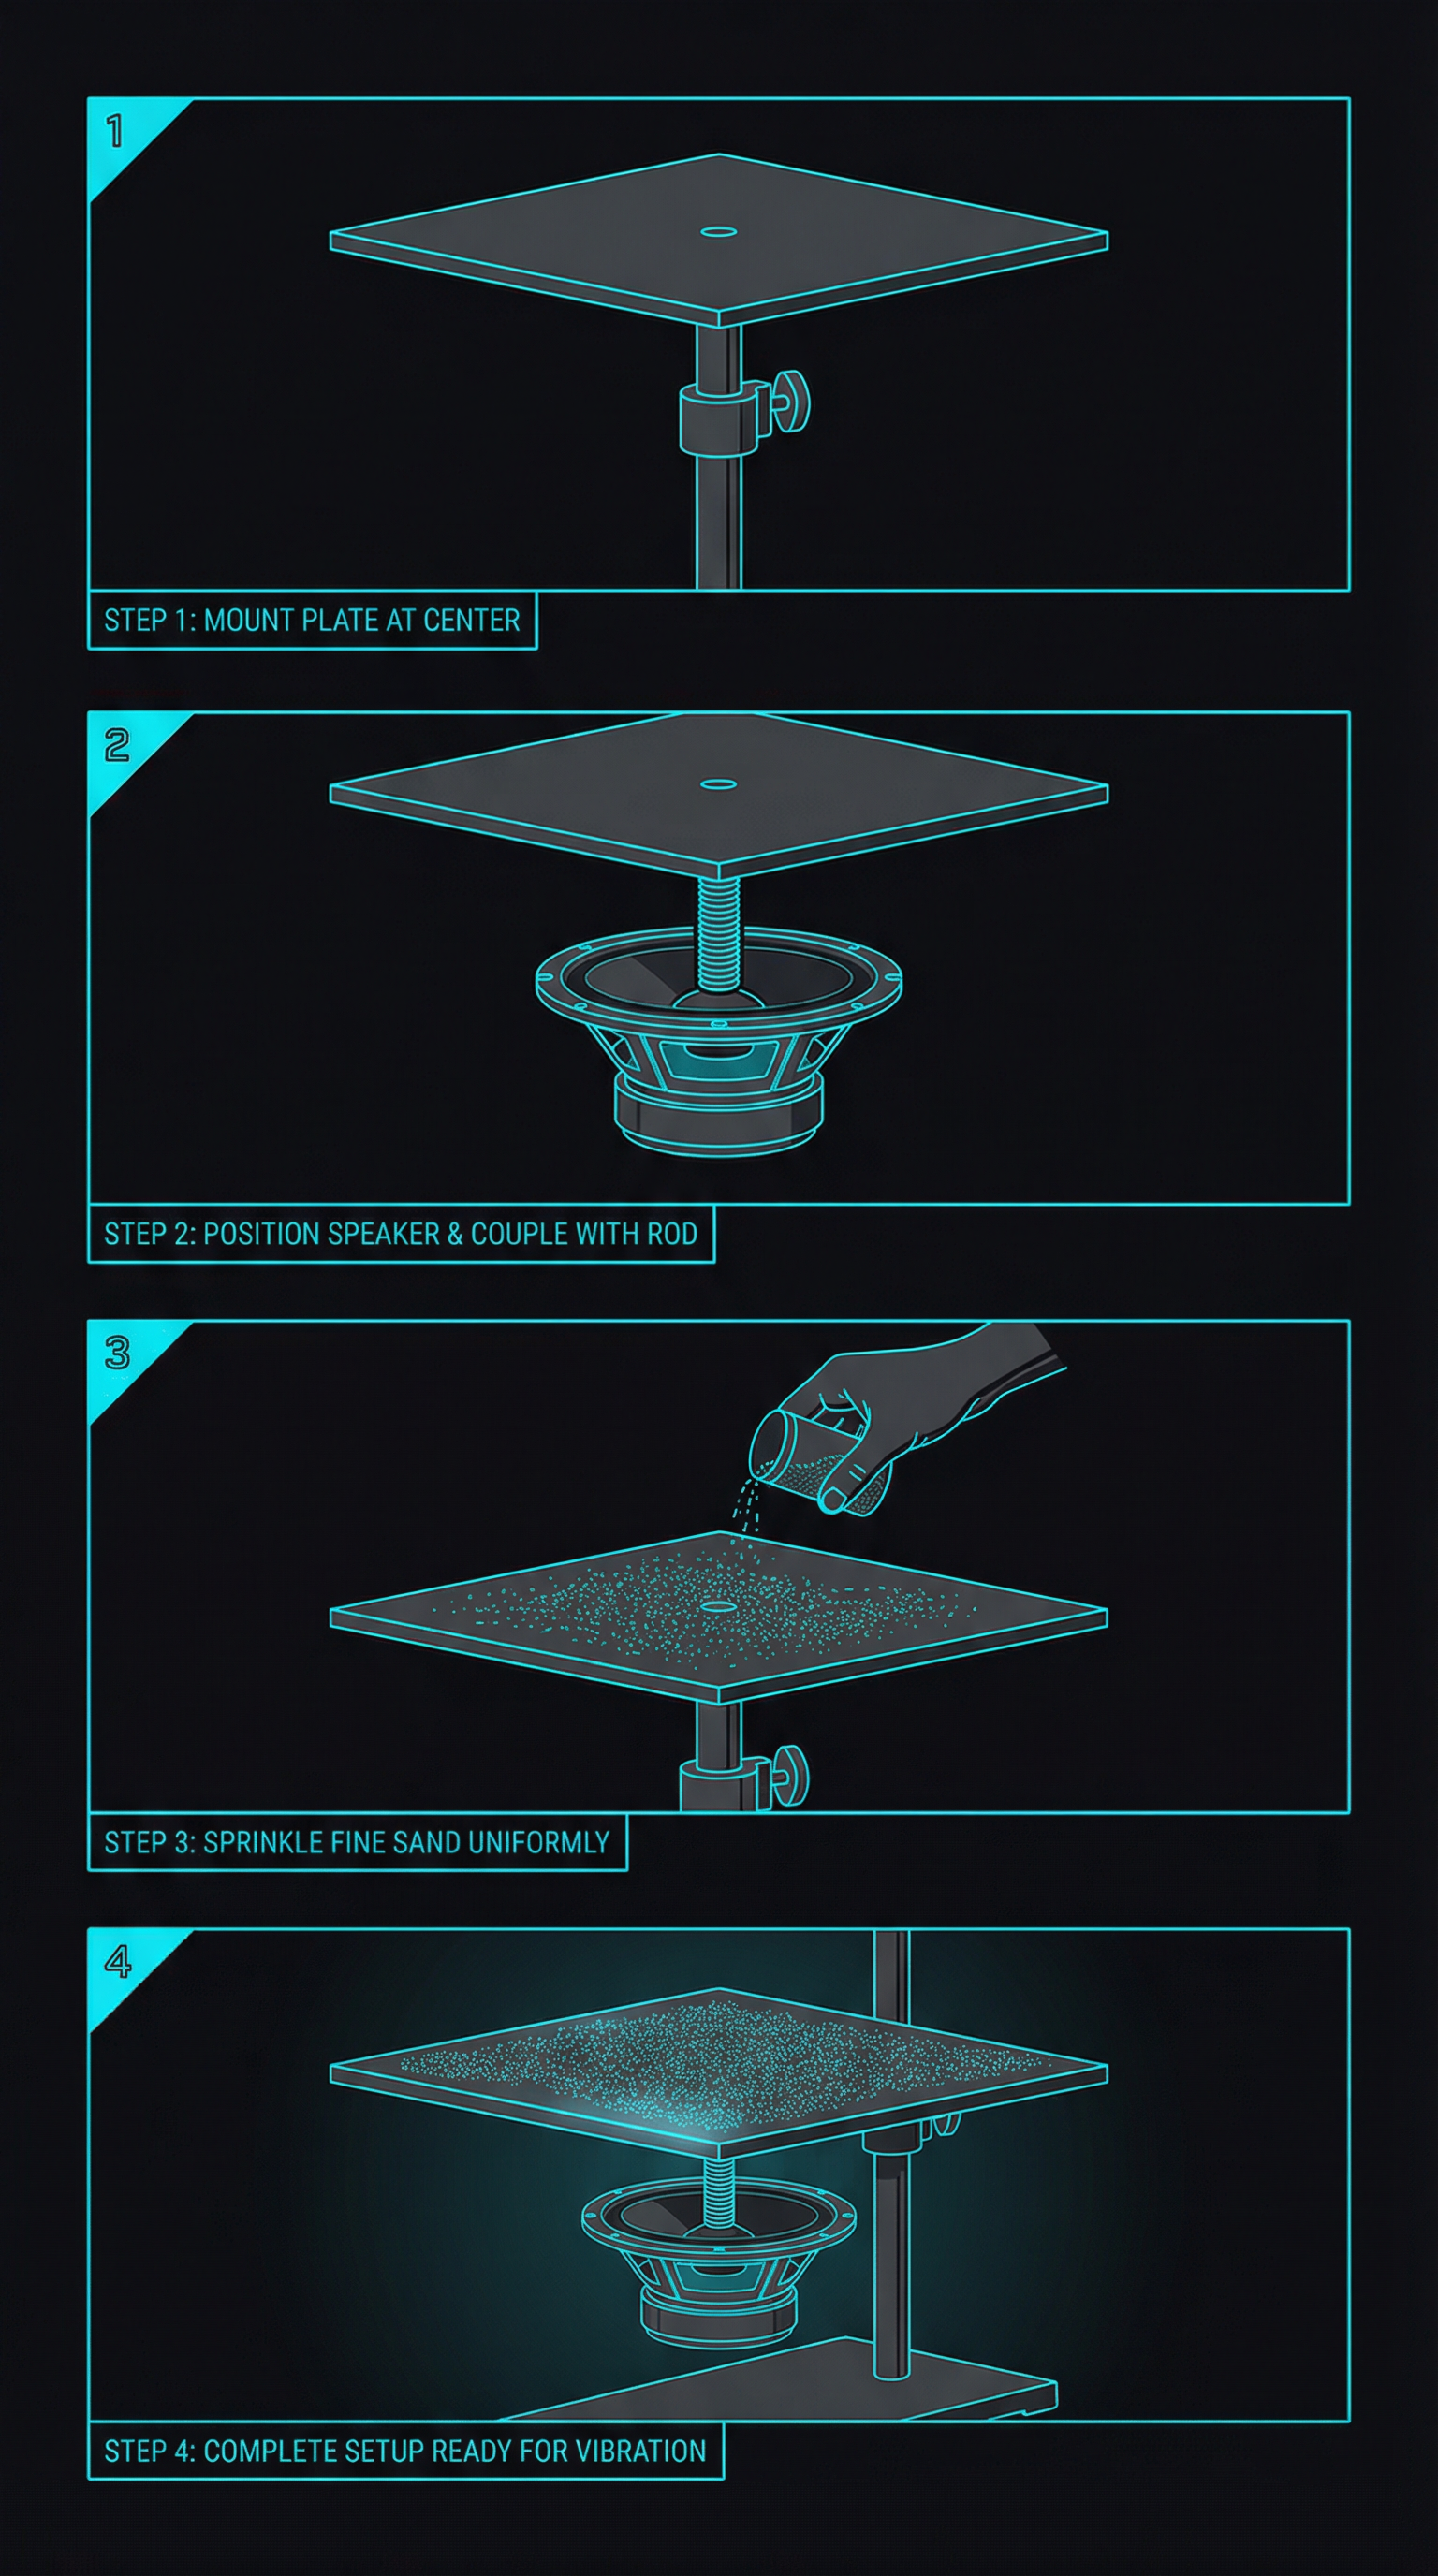 Key assembly steps: center mount → speaker coupling → sand layer → ready to run.
-
Mount the plate at its center using a bolt, clamp, or post so that all edges are free to vibrate. The single-point mount is critical — any additional contact will dampen modes and distort patterns.
-
If using a speaker driver: Attach a small threaded rod or dowel to the speaker cone with epoxy. This post presses against the bottom center of the plate, coupling the speaker's vibration directly into the metal. Connect the speaker to an amplifier fed by your tone generator.
-
If using a violin bow: Apply rosin liberally to the bow hair. You will draw the bow along one edge of the plate while pressing a fingertip against another edge point to force a specific nodal geometry.
-
Spread a thin, even layer of sand across the entire top surface of the plate. Too much sand dampens vibration; too little leaves gaps in the pattern. A light dusting is ideal.
-
Dim overhead lights and use side-lighting to make the sand patterns more visible. A dark plate with light-colored sand (or vice versa) improves contrast.
Procedure
Phase 1 — Finding the Fundamental
Set your tone generator to approximately 200 Hz and slowly increase the amplitude. Watch the sand. At the plate's lowest eigenfrequency, sand will begin migrating toward the nodal lines — the places where the plate does not move. You should see a simple pattern: a few broad lines dividing the plate into vibrating regions.
The sand does not move toward sound. It moves toward silence.
Phase 2 — Ascending the Harmonic Ladder
Slowly sweep the frequency upward. At each new eigenfrequency, the sand will briefly scatter and then reassemble into a new, more complex pattern. Note these resonant frequencies — they are the plate's modal spectrum, as unique to this plate as a fingerprint.
- Low modes (~200–600 Hz): Simple crosses, circles, or diagonal lines
- Mid modes (~600–2000 Hz): Intricate grids, concentric shapes, and star-like forms
- High modes (~2000–6000 Hz): Dense, filigree patterns with dozens of nodal lines
Phase 3 — Mapping Modes
For each clear pattern you discover:
- Record the frequency
- Photograph the pattern from directly above
- Sketch the nodal line geometry
You are building a modal map of your plate — the same analytical technique used in engineering to study vibration in aircraft panels, guitar tops, and bridge decks.
Phase 4 — Exploring Symmetry
If your plate is square, notice how the patterns respect the plate's four-fold symmetry. Press a fingertip to one edge while bowing — you are pinning a node, forcing the plate into a specific mode and breaking the degeneracy between modes of the same frequency. Different touch points select different members of a degenerate mode pair, producing mirror-image or rotated patterns at the same pitch.
Sources
- Chladni, E.F.F. Entdeckungen über die Theorie des Klanges. Leipzig: Weidmanns Erben und Reich, 1787.
- Waller, Mary D. Chladni Figures: A Study in Symmetry. London: G. Bell and Sons, 1961.
- Rossing, Thomas D. "Chladni's Law for Vibrating Plates." American Journal of Physics 50, no. 3 (1982): 271–274.
- Germain, Sophie. Recherches sur la théorie des surfaces élastiques. Paris: Huzard-Courcier, 1821.